Managing Injury Reports
Learn how to manage injury reports and how to categorize by type of injury or illness. Track incident dates, days lost, OSHA recordable injuries and more.
Submitting an Injury Report
You may be confused about exactly what you should do in the aftermath of a work injury, but one thing should be abundantly clear – you should report your injury to management as soon as possible.
Managing Injury Reports
When managing an Incident Report, you can review the information previously submitted. You also have the capability of adding important details to the report that can only be done through the Supervisor Portal.
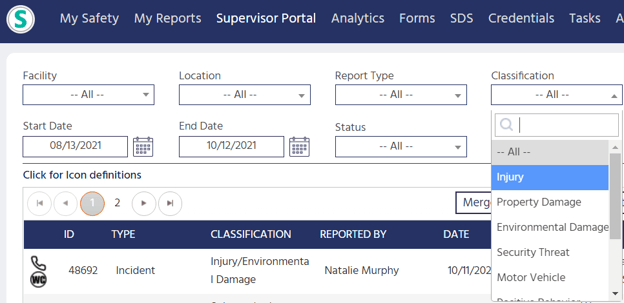
Under Classification, select Injury to filter.

Accessing Incident Report Details
From the Report Management menu, the second tile from the left will be labeled Incident Report. On this tile, you will see the name of the person that submitted the report and their employee ID number and job title. Under this information, you will see INCOMPLETE. Once the report has been closed, this will change to COMPLETE. For more information on closing a report, click here
To see the report details and to add information, click the Incident Report tile. The details of the report will appear on the right of the page.
-png.png?width=678&name=Blank%20diagram%20-%20Page%201%20(27)-png.png)
Managing Injury Reports
The first portion of the Incident report will display information that was submitted in the original report. If the report included an injury, you will see the heading Injury within the Incident report summary. Below this heading, you will see the information that has already been submitted for the report. After the Injury Location, there will be a series of questions for you to answer. If a question is not applicable, leave it blank.
If other types of incidences were selected in the initial report, additional questions may be generated on this page to review and complete. For directions on how to manage other types of Injury reports, skip to
Additional Questions for Other Types of Incidences
Type of Injury?
Select all that apply for the type of injury that occurred, if any:
- Foreign object in the eye
- Loss of eye
- Thermal burn
- Chemical burn
- Biological bite/dermatitis
- Fracture
- Dislocation
- Amputation
- Hernia
- Other
If the type of injury is not listed, select Other, click the red text box PLEASE SPECIFY and type the injury that occurred. Types of injuries will automatically be added to the OSHA forms for this incident.
Type of Illness?
Select all that apply for the type of illness that occurred, if any:
- Skin
- Respiratory
- Sensitization
- Cardiovascular
- Central Nervous System
- Chronic disease/condition
- Hearing loss
- Poisoning
- Allergic Reaction
- Other
If the type of illness is not listed, select Other, click the red text box PLEASE SPECIFY and type the illness that occurred. Types of illnesses will be automatically be added to the OSHA forms for this incident.
What time did the employee begin work the day of the incident?
- To select the time that the employee began to work the day of the incident, click the text box __:__ AM and enter the time in a four-digit format. For example, “05:35PM.”
- You can also select the time by clicking the clock icon to the right.
- A pop-up window of a clock will appear.
- Begin by clicking either AM or PM found in the upper left and right-hand corners of the window.
- Then click the number on the clock to indicate the hour of the time to be displayed. Then click NEXT.
- Then click the number on the clock to indicate the minutes of the time to be displayed.
- The selected time will appear at the top of the pop-up window, highlighted in blue. If this is the desired time, click NEXT and you will be returned to the details of the report.
What was the employee’s last day of work?
- To select the date of the employee’s last day of work, click the text box MM/DD/YYYY and type the date using the MM/DD/YYYY format.
- You can also enter the date by clicking the calendar icon to the right.
- A pop-up window containing a calendar will appear.
- At the top right and left corners of the window, you will see white forward and back arrows. Click the arrows until the desired month appears in the center.
- Under the first set of arrows, you will see another set of white arrows. Click the arrows until the desired year appears in the center.
- Then click on the calendar to select the day
- Once the desired date is displayed at the top of the pop-up window highlighted in blue, click OK, and you will be returned to the details of the report.
- To cancel the date selected, click CANCEL, or click the “X” on the top right-hand corner of the pop-up window and you will be returned to the details of the report.
If the employee died, what date did the death occur?
- To select the date that an employee died, click the text box MM/DD/YYYY and type the date using the MM/DD/YYYY format.
- You can also enter the date by clicking the calendar icon to the right.
- A pop-up window containing a calendar will appear.
- At the top right and left corners of the window, you will see white forward and back arrows. Click the arrows until the desired month appears in the center.
- Under the first set of arrows, you will see another set of white arrows. Click the arrows until the desired year appears in the center.
- Then click on the calendar to select the day.
- Once the desired date is displayed at the top of the pop-up window highlighted in blue, click OK, and you will be returned to the details of the report.
- To cancel the date selected, click CANCEL, or click the “X” on the top right-hand corner of the pop-up window and you will be returned to the details of the report.
What was the employee doing just before the accident?
Click on the empty textbox and type what the employee was doing just before the accident.
Was the employee hospitalized overnight as an inpatient for care or treatment?
Depending on whether or not the employee was hospitalized overnight as an inpatient for care or treatment, click Yes or No.
Was the employee treated in an emergency room?
Depending on whether or not the employee was treated in an emergency room, click Yes or No.
If treatment was given away from the worksite, where was it given?
- Next to Worker’s Comp Organization, click the text box and a drop-down list will appear. Click the facility name in the list to select or click Other.
- Next to Provider, Facility, Street, City, State, Zip, click the text box and type the required information.
What object directly harmed the employee?
Click the textbox below this question and type the object that directly harmed the employee, if any.
Was the employee involved in working extended hours? (In excess of 8hrs/day or 40 hrs/week)
Depending on whether or not the employee was working extended hours, click Yes or No.
Has the employee performed the task before?
Depending on whether or not the employee has performed the task before, click Yes or No.
Is injury covered by Worker’s Compensation?
Depending on whether or not the injury is covered by Worker’s Compensation, click Yes or No.
Is the injury OSHA recordable?
Depending on whether or not this injury is OSAH recordable, click Yes or No.
NOTE: Based on how previous questions in the report have been answered, Yes may have automatically been selected.
Are there other recordable cases of safety instances with this employee?
Depending on whether or not there are other recordable cases of safety instances with this employee, click Yes or No.
Will injury result in restricted activity?
Depending on whether or not this injury resulted in restricted activity, click Yes or No.
Will injury result in a lost workday?
Depending on whether or not this injury will result in a lost workday, click Yes or No.
How many days was the employee away from work?
Click the text box and type how many days the employee was away from work.
Was the employee transferred to a different job or put on restriction?
Depending on whether or not the employee was transferred to a different job or put on restriction, click Yes or No.
How many days was the employee transferred or put on restriction?
Click the text box and type how many days the employee was transferred or put on restriction.
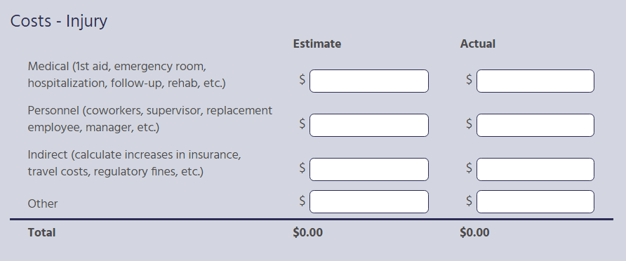
Costs – Injury
In this section, you can enter both the estimated and actual costs associated with the injury, if any.

For each line item that has a cost, click on the blank text box next to $ and enter the amount using your computer’s numerical keyboard. If there is no cost associated with a line item, you can leave it blank. The totals for each category will appear at the bottom of each column for both estimated and actual costs.
Suggested Improvements
The initial Incident Report will have a section for suggested improvements which you can review here.
Saving Reports
Once all questions have been reviewed and completed, click Save.
Printing Reports
To print the Close Call Report, click the printer icon at the top right-hand corner of this page and then follow your computer’s printing instructions.
Editing Reports
To edit any portion of the report that was originally submitted in the initial report, click on the edit icon found at the top left-hand corner of this page. Once changes have been made, click Save at the bottom of the page.
To exit editing mode without saving changes, click the “X” at the top-right corner of the report. A pop-up window will appear, “Do you want to save the report?” Click Yes to save your changes or No to not save your changes.
Additional Questions for Other Types of Incidences
If other types of incidences were selected in the initial report that was submitted, additional questions may be generated on this page to review and complete.
For more information on managing the different types of Incidence Reports, click the links below.
(Link to Managing Motor Vehicle Reports)
(Link to Property Damage Reports)
