
 About Supervisor Portal
To access the Supervisor Portal
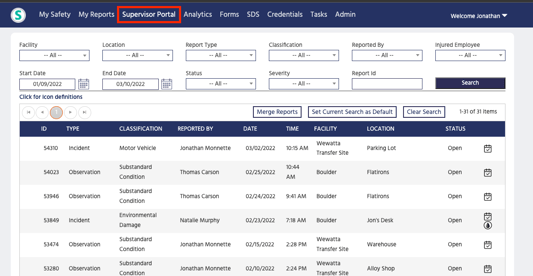
Navigating and filtering the Supervisor Portal
Filters available:
Filters allow you to reduce the list of reports shown to only those that share common attributes. To use a filter, click on the dropdown box underneath the filter title that you wish to use. For each filter you utilize, you will need to select it from its dropdown and then click Search each time, in order for it to take effect.
- Facility
This will filter the list to show only the reports that were reported to have occurred at a specific facility. - Location
This will filter the list to show only the reports that were reported to have occurred at a specific location. *Note that you must pick a facility before using this filter.* - Report Type
This will filter the list by report type, the report types are Incident, Close Calls, and Observations. - Classification
This will filter the list by report classification. The available classifications are Security Threat, Motor Vehicle, Injury, Property Damage, Environmental Damage, Positive Behavior, At-Risk Behavior, Substandard Condition, or Suggestion. - Reported By
This will filter the list by who submitted the report. Selecting an employee’s name from this drop-down will show only reports that were submitted by that individual. If a person’s name is not listed here, that is because they have never submitted a report. - Injured Employee
Selecting an employee’s name from this drop-down will show only reports that were submitted by that individual. If a person’s name is not listed here, that is because they have never submitted a report. - Status
The status options are either Open or Closed.
Severity
This filter will allow you to choose from OSHA Recordable, OSHA Reportable, Covered by Worker's Compensation, or Emergency. - Setting the Date Range
To select the Date Range, choose a Start Date and End Date. Then click Search.
-
You can also adjust the date by clicking on the calendar icon to the right of the date text box, clicking the desired date and then clicking OK.
-
Repeat these steps to select the End Date. NOTE: The date of the report is based on when the incident or observation occurred, not when the report was submitted.
-
- Search by Report Id

- Under Report Id, click your cursor in the text box.
- Using your computer’s number keyboard, type the Report Id number. Only the numbers, do not include any symbols. (format: 00000).
- Click Search
- If you would like to search for all Report Id numbers, leave blank.
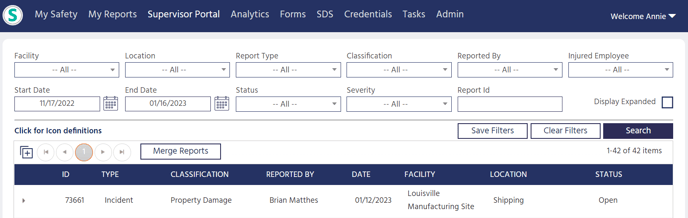
- Display Expanded
Click this to display the description of each report while on the supervisor portal page.
Set Current Search as Default
If you would like to always have specific search fields enabled each time you return to the Supervisor Portal you can use the Save Filters button. An example of this would be if you only were concerned about a specific facility's reports, you could save that filter as the default.
NOTE: The saved default settings are unique to each login profile. All search fields selected will be saved as a default setting except for the Start Date and End Date search fields.
.png?width=418&height=148&name=My%20project-1%20(21).png)
Sorting Reports
- Click once for ascending order (aka smallest to largest, 0 to 9, and/or A to Z)
- Click a second time for descending order (aka largest to smallest, 9 to 0, and/or Z to A)
- Click a third time to return the sorting order to the default.
Understanding the Icons on the Supervisor Portal
How to change pages
- To navigate forward to the next page, click the forward arrow.
- To navigate back to the previous page, click the backward arrow. To navigate to the last page of the report results, click.