

Managing and Assigning Credentials
If your role in Sospes is a Supervisor, Safety Professional, and/or Credential Admin, you will have access to the Credential Overview found under Credentials. In order to access the Credential Manager, you must have the Credential Admin role. For more information on user roles and permissions, click here.

The Credential Manager gives you the ability to manage employee credentials in Sospes. Because continued education is often required within many fields, this keeps workers up to date on new technologies, safety procedures, and skills within the industry. Properly tracking employees’ continuing education helps you and your company stay current and it protects your business from liability due to excess expired trainings.
With Sospes, you can organize your system to recognize who is due for renewal, ensuring your employees are in compliance and up to date!
Credential Manager - How to Navigate
To open the Credential Manager, from the Credential Overview page, click the tab on the upper-right hand corner titled Open Credential Manager.

On the next page, you will see a menu on the left-hand side to navigate to other pages:
- Credential Overview: Returns you to the Credential Overview
- Manage Credentials: This allows you to manage and create credentials.
- Assign Credentials: Gives you the ability to assign credentials to specific employees.
- Credential Employees. Access to specific employee credentials to view, manage and update credential information.
- Credential Multiple Employees: Access to record training dates for multiple employees simultaneously.
- eLearning Assignments: Access to view the number of attempts users have made during an eLearning credential or edit the allowed number of attempts by user.

Manage Credentials
To manage existing credentials and/or create a new credential, click the Manage Credentials tab on the left. This will open the Manage Credentials page. At the top of the page, you will see two tabs: Active Credentials and Archived Credentials.
Create and/or Edit a Credential
To view or edit the details of a specific credential, click on the credential you would like to edit. You will then need to select EDIT at the bottom of the page where you can edit the title, alert settings, renewal settings, assigned user groups etc. Alternatively, if you would like to create a new credential, select the ADD NEW CREDENTIAL button at the top of the list.
- Title: Click the name of the credential that appears in the first textbox. Using your computer’s keyboard, edit the text as needed.
- Description: In the second textbox, click the description of the credential. Using your computer’s keyboard, edit the text as needed.
- How long is credential "expiring soon"?: Enter the amount of days you would like credential managers and supervisors to be notified before a credential is considered "expiring soon". For eLearning, once a credential enters it's expiring soon period it will be available to re-take.
- How many months is this credential valid?: Enter the amount of months a credential is active before it is required to be renewed.
- This credential does not expire: Activate this toggle for any credentials that are not required to be renewed.
- Generate Completion Certificate: Activate this toggle for any credentials you would like a completion certificate to be generated for.
- Is it eLearning?: Activate this toggle for e-learning specific courses. You will then be required to attach a SCORM compliant ZIP file to the credential.
- Number of attempts: Enter the amount of attempts users are allowed while completing the eLearning course quiz.
- Date Start: If you would like this course to be accessible by users on a specific date in the future, enter that here. Otherwise, leave this field blank and it will be available to complete immediately by any assigned users.
To save any changes you’ve made, click SAVE and you will be returned to the Manage Credentials
Archive a Credential
To archive a credential, click the picture of the icon to the right of the credential name. This training credential will be sent to the Archived Credentials tab.
How to Assign Credentials to a Group of Users
Currently, there are two ways to assign a credential to an employees. Most of the time, credentials should be assigned through our User Groups page, which can be found in the Admin menu. User groups can be created by users with the User Group Admin role. As a group of employees often share similar trainings depending on their role, we suggest using the User Groups page to mass assign credentials to a group of employees.
First, a user must have the User Group Admin role to access the User Groups page. We recommend any employee that is managing credentials within Sospes to have both the User Group Admin role and the Credential Admin role to successfully manage all employee credentials in Sospes.
- To begin assigning credentials to a group of employees, follow the steps in the previous section to create a credential on the Manage Credentials page. Once this is done, go to Admin and then User Groups on the left-hand side.
- To create a new user group for the purpose of assigning credentials, select the ADD GROUP button. Then, select the User Group option.
- Give your group a name and description. For example, if you have a group of forklift operators that all need the same training, call the group "Forklift Operators". For more information on user groups, and how to automatically add users to a group when an employee import occurs, view this knowledge base.
- You can now add employees to your user group by selecting the ADD MEMBERS button. Once you've added your chosen employees to the group, select the ADD MEMBERS button at the top left.
- Your user group is now ready to be linked to a credential. Navigate back to the Credentials tab and select Manage Credentials. Then, select the credential you would like to assign to the group you created. Lastly, select EDIT at the bottom of the page.
- Scroll to the bottom of the page under the header Assigned User Groups, select the user group from the drop-down and click the + sign. Once done, select SAVE at the bottom. All users in the user group will now be assigned this credential.
How to Assign Credentials to an Individual User
In situations where a single employee needs to be assigned a one-off credential, users with the Credential Admin role can now assign and credential an employee on an individual user's credential profile under the Credential Employees page.
Please note: This feature is not intended to replace assigning credentials through User Groups, but to assign one-offs to a single user as needed. Additionally, please allow time for the system to refresh before seeing the credential appear on the user's profile after saving.
- To assign a one-off credential to an individual employee, click on the Credentials tab, Open Credential Manager on the right, and then Credential Employees on the left.
- Select the employee you would like to assign a one-off credential to.
- Select the ASSIGN CREDENTIALS button.
- Select the credential from the drop-down, then the + sign. Once done, select SAVE. The system will take about a minute to refresh for the credential to appear on the employee's profile. Refresh the page, once it has appeared, you can enter the credential date and click CREDENTIAL.
Navigating an Employee Profile
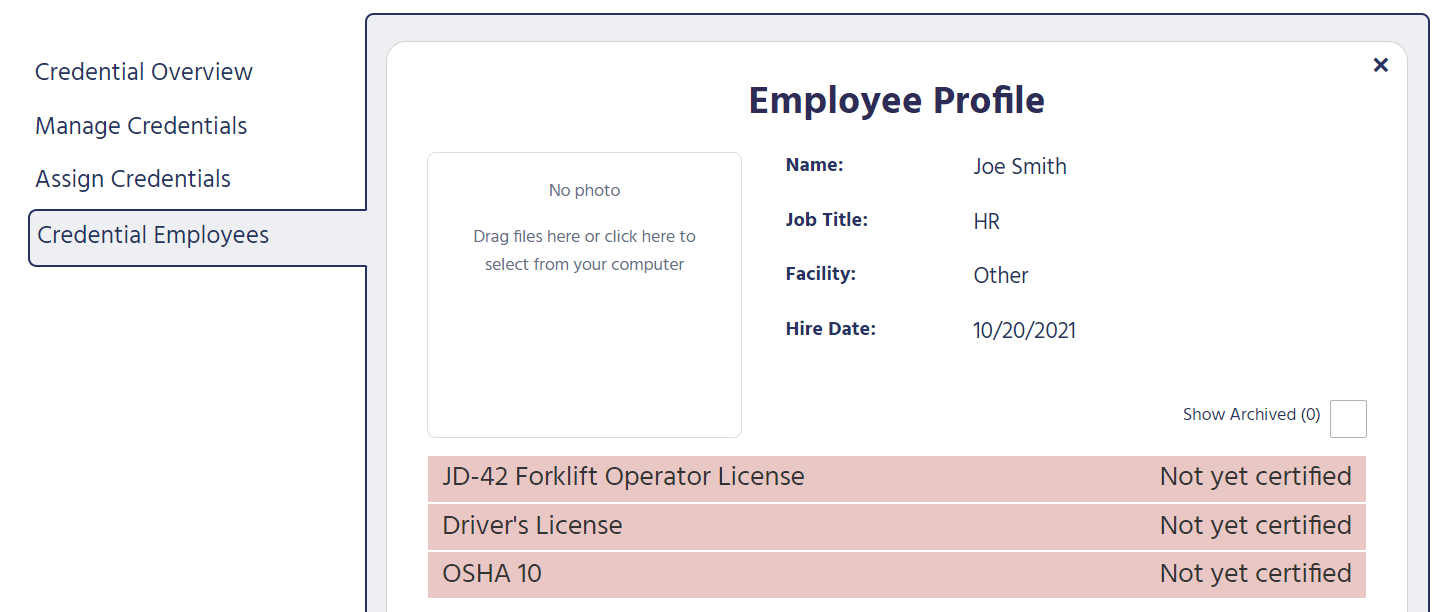
Employee Information
This section of the Employee Profile will list the following information for the employee:
- Name
- Job Title
- The facility they are assigned to
- Hire Date
Employee Credentials
At the bottom of the page, you will see the list of credentials the employee has that are current, about to expire, or expired. On the left is the name of the credential and to the right is the expiration date. The highlighted color will indicate the status of the credential:
Green = Credential is current and up-to-date.
Yellow = Credentials that are due to renew and have entered their "expiring soon" period, will turn yellow. When you are ready to renew an "expiring soon" credential, select the RENEW button with the credential expanded. The previous credential will be archived and you will be able to enter information on the new renewal credential.
Red = Credentials that are expired or not yet certified (a date has not yet been entered but the employee has been assigned the credential) will remain red. Also, a credential that has passed it's expiration date will archive itself, and the new "not yet certified" credential will appear in red.
Add Credential Information
-
- To add the details for the “not yet certified” credential, click on the name of the credential in the red header.
- The details that need to be completed for that particular credential will appear below and the following textboxes will need to be completed:
- Credential Number
- Date Credentialed
- Expiration Date
- Attributes (if applicable)
- Credentialed by (Trainer’s Name)
- Issued by (Name of Training Institution)
Renew, Revoke and Suspend Credentials
For those credentials that are either current (green) or soon to expire (yellow), you have the option to renew, revoke or suspend the credential. At the bottom of the credential details, you will see these options:

Renew Credential
Renewing a credential will archive the "active" or "expiring soon" credential, then the system will generate a new "not yet certified" credential, where you can enter the new date and any other credential information.
- To renew a current or soon to expire credential, click RENEW CREDENTIAL.
- A pop-up window will appear, “Are you sure you wish to Renew this employee’s credential? The current credential will be archived.”
- If you click NO, you will be returned to the credential details. You can also exit this window by clicking the “X” in the upper right-hand corner of the window.
- If you click YES, the current credential will be archived.
- A new credential with the same name will appear in the list with the same credential number, trainer name, and training institution name that was on the previous credential.
- This credential will now be highlighted in red (not yet certified).
- Once an updated credential date and expiration date and entered, click SAVE at the bottom of the screen.
- Press CREDENTIAL at the bottom of the page and the highlight of the credential will be changed to green (current).
Revoke Credential
In an instance where an employee's credential needs to be revoked in order for the employee to be retrained, you have the option to revoke the credential. If a credential is revoked, all previous information on the credential will be cleared and the credential will appear as "not yet certified".
- To revoke a current or soon to expire credential, click REVOKE CREDENTIAL.
- A pop-up window will appear “Are you sure you wish to Revoke this employee’s credential? This cannot be undone.”
- If you click YES, the name of the credential will remain on the employee's profile as "not yet certified" and all previous credential information will be cleared.
Suspend Credential
In an instance where an employee's credential needs to be temporarily suspended, you have the option to mark a credential as Suspended. If a credential is suspended, all credential information will be stored until the credential is restored.
- To suspend a current or soon to expire credential, click SUSPEND CREDENTIAL.
- A pop-up window will appear “Are you sure you wish to Suspend this employee’s credential?”
- If you click YES, the name, date, and details of the credential will remain stored. The name of the credential will be highlighted red and the status on the right will display as suspended.
- To restore a credential that has been suspended, click RESTORE CREDENTIAL. The credential will return to its previous state.