
Facilities and Locations
Sospes can store all of your facilities and locations making it easy to attach details to your reports. Facilities are defined by having their own unique address. Within a facility, there may or may not be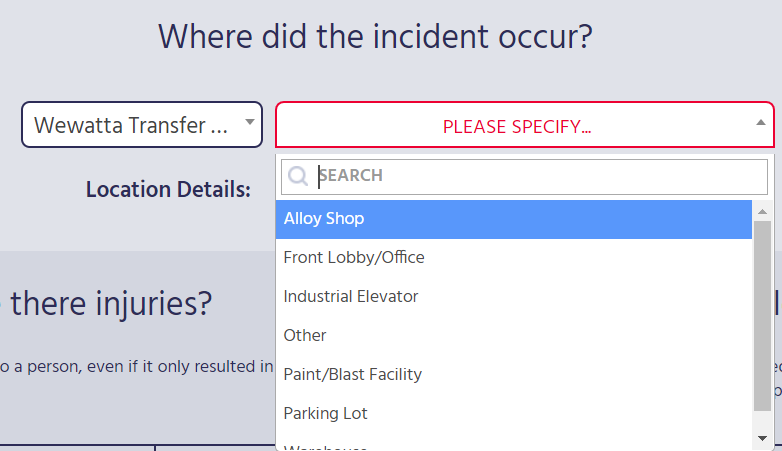 specific locations. For example, a facility, “Headquarters,” may have locations such as “office,” “lobby,” "elevator," or “parking lot.”
Facilities
Facilities need to be added to your Sospes environment before adding the locations.
Creating Facilities
- To create company facilities, click on the Admin tab at the top of the page.
- Along the left-hand side of the page, click Facilities.
- Click Add Facility and a new page will appear to Create Facility.
-png.png)
Facility Address Details
- In the textbox next to Name, enter the name of the location. For example, “Headquarters.”
- Next to Address 1, enter the address associated with this facility.
- Next to Address 2, enter additional address information if applicable.
- Next to City, enter the city of the facility’s address.
- Next to State, enter the state of the facility’s address.
- Next to Zip, enter the zip code of the facility’s address.
- Next to GPS, enter the GPS information of the address if available.
- Next to Establishment, click the textbox and a dropdown window will appear with a list of establishments. Click the name of the establishment associated with this facility. You can also search for the name of the establishment by clicking the textbox next to the search icon and begin typing the establishment name until it appears on the list.
- Next to Business Unit, click the arrow to open the dropdown menu and choose a business unit associated with this location. For more details on business units, click here.
Annual Goals
- To view and/or create the Annual Goals associated with this facility for Injury Rate Goal and DART Goal, select the year by clicking the arrow to open the dropdown window and select the year.
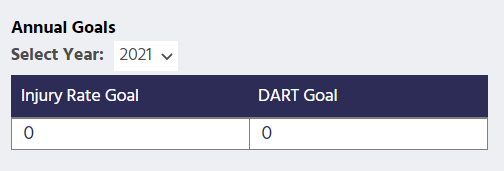
- Click on the number under the Injury Rate Goal and enter the desired number.
- Click on the number under the DART Goal and enter the desired number.
- Then click SAVE.
Responsible Parties
- Under the Responsible Parties header, click the textbox under Employees to open a dropdown menu of all employee names in the system.
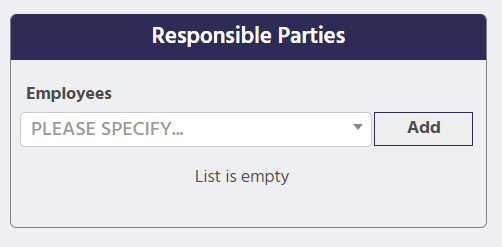
- You can also search for an employee name by typing the first or last name of the employee in the SEARCH textbox at the top of the dropdown list.
- Click on the employee name that would be responsible for this particular location.
- Then click Add so that the employee name appears in a textbox below the textbox.
- To remove an employee name, click the red “X” to the left of the textbox containing the employee name.
- Additional employee names can be added as the responsible party if needed.
NOTE: A responsible party is a person or people who are associated with that facility and they may receive different alerts regarding that facility depending on how they are configured.
- Once the employee name is selected and appears in the textbox, click Add to the right of the employee name and the name of the employee will appear in an additional textbox below. To remove an employee name as a responsible party, click the red “X” to the right of the employee name.
- Click Save.
Facilities List
From the Facilities page, you can see the list of facilities that have already been created in your Sospes environment, with the name of the facility, business unit, city, state, and active status.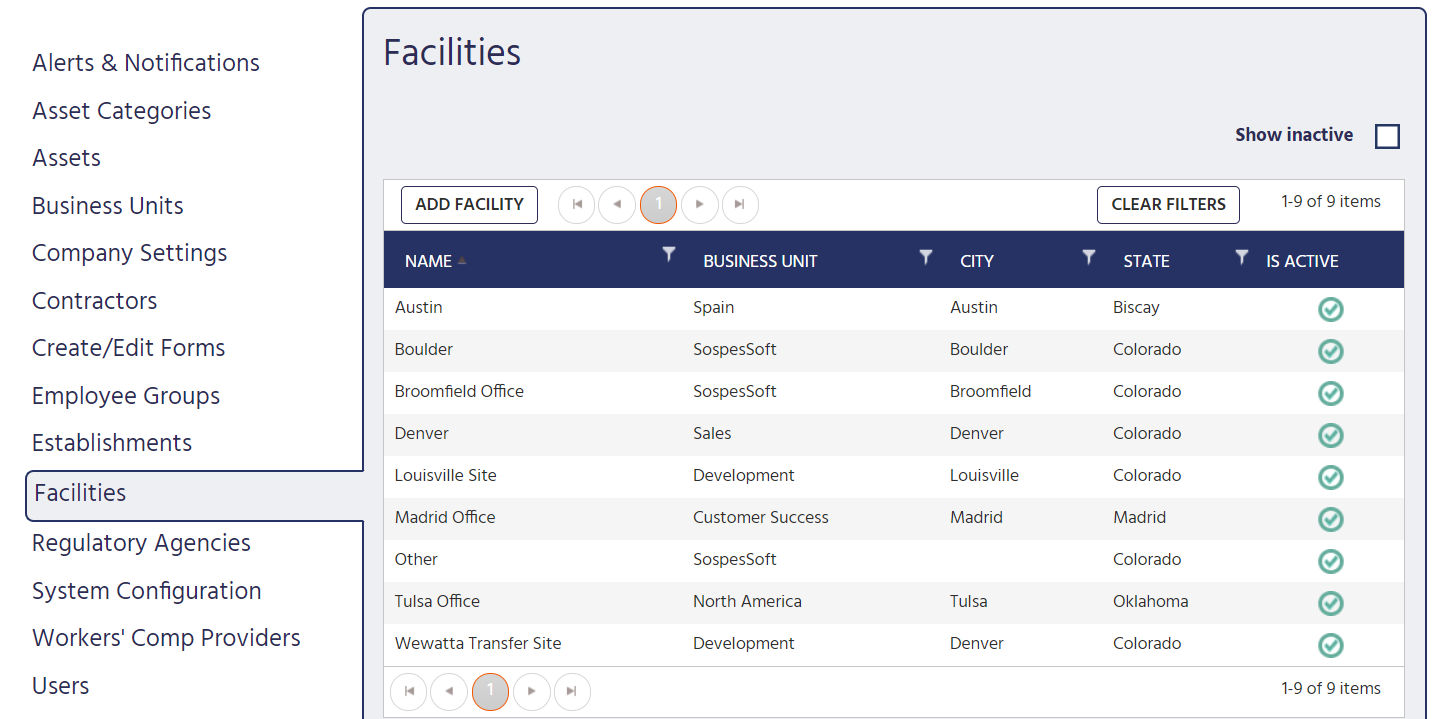
To view a list of current facilities in the system, click Admin at the top of the page.
- Along the left-hand side of the page near the bottom of the list, click Facilities.
- A window will appear entitled Facilities which will give you a directory list of all of the facilities that are in your Sospes environment.
- To view the details of facilities, double-click anywhere on the line of that particular facility.
Sorting Facility List
From the Facilities page, you can sort the category list by clicking on one of the column names found in the dark blue banner at the top. You can sort by either name, business unit, city, state, and active status.
- For example, to view a facility list by name, click NAME in the dark blue banner at the top of the list of facilities.
- If you click once, the list will be sorted in alphabetically ascending order by the name of the facility.
- If you click twice, the list will be sorted in alphabetical descending order.
Searching Facility List
You also have the option to search for a specific facility or narrow down your list of facilities by creating specific search criteria.
For example, you can search for a specific facility such as, “Denver Headquarters.” To do this, click the search icon to the right of the column header you would like to search by, either name, business unit, city, or state. A pop-up window will open below:
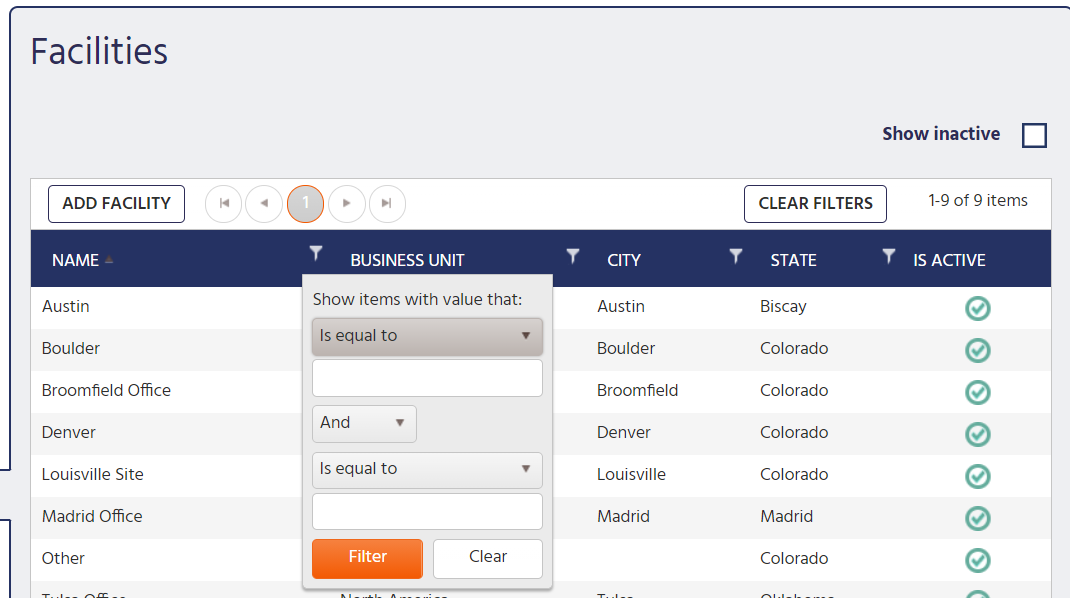
Defining your search values:
- Under Show items with value that: click on the first textbox Is equal to and a dropdown menu will open.
- This will give you the following options for your search criteria:
- Is equal to
- Is not equal to
- Starts with
- Contains
- Does not contain
- Ends with
- Click the search criteria you would like to use, and it will appear in the textbox.
- Click the blank textbox below the search criteria you selected and type the numerical values of your search.
And/Or:
- You can further define your search values by clicking the textbox And. A dropdown menu will appear with two options:
- And
- Or
- Click the search criteria you would like to use, and it will appear in the middle textbox.
Further defining your search values:
- You can even further define your search values by clicking the third textbox Is equal to and another dropdown menu will open.
- This will give you the following options for your search criteria:
- Is equal to
- Is not equal to
- Starts with
- Contains
- Does not contain
- Ends with
- Click the search criteria you would like to use, and it will appear in the textbox.
- Click the blank textbox below the search criteria you selected and type the numerical values of your search.
Filter:
Once you have set the search criteria, click Filter. The results of your search will appear on the page.
Reset:
To reset your search results and return to the complete list of facilities:
- Click search icon
- A pop-up window will open below.
- At the bottom of the pop-up window, click Clear.
- You will be returned to a complete list of facilities.
- You can also clear the search filter by clicking Clear Filters at the top right of the page.
Navigating Facility Pages
If there are multiple pages to your facilities list, next to the ADD FACILITIES button you will see circular buttons containing the number of pages that are in the list, as well as navigation buttons.
- To go to a specific page in the facilities list, click on the page number.
- To go to the next page of the facilities list, click the arrow forward button.
- To go back to the previous page, click the arrow backward button.
- To go to the last page in the facilities list, click the last page button.
- To go to the first page in the facilities categories list, click the first-page button.
Locations
Once facilities are added, you can add the specific locations that are at each facility, if any. For example, if the facility is “Denver Headquarters,” you may have locations at that facility, such as “Main Office,” “Lobby” or “Restroom.”
Adding New Locations
- To set up your locations, click on the Admin tab at the top of the page.
- Along the left-hand side of the page, click Facilities.
- Find the name of the facility in the list for which you want to add location information and then double-click the name of the facility.
- A page will open Edit Near the bottom of the page you will see the header Locations within facility.
- Click the Add Location
- Next to Name, click on the text box NEW LOCATION and enter the name of the location at this facility. For example, “Main Office.”
- At the bottom of the page, click Save.
- Continue to add additional locations for this specific facility by repeating the previous instructions, making sure to click Save after each new location is added.
Location List
- You will see the locations that have been added to the details of the facility listed under NAME.
- You will also see whether those locations are active if there is a green checkmark under the IS ACTIVE
- To view inactive locations, click the box next to Show inactive until a green checkmark appears. Inactive locations will now appear below in the list of locations.
- To hide inactive locations from the list, click the box next to Show inactive until the green checkmark disappears.
Annual Goals
- To view and/or create the Annual Goals associated with this facility for Injury Rate Goal and DART Goal, select the year by clicking the arrow to open the dropdown window and select the year.
- Click on the number under the Injury Rate Goal and enter the desired number.
- Click on the number under the DART Goal and enter the desired number.
- Then click SAVE.
Total Hours Worked At This Location
- To view and/or create the Total Hours Worked At This Location associated with this location, select the year by clicking the arrow to open the dropdown window and then click the year you would like to view/create/edit.
- Click on the numbers next to each month in the Total Hours column and enter the desired number.
- Then click SAVE.