
Sospes allows users assigned as Admins and Safety Professionals with the Form Admin role to easily create, edit, and monitor forms completed by anyone in your institution.
- Sospes makes it easy to build digital forms for your team to access and submit from their computer, tablet, or mobile device!
- Forms can be built to emulate old, paper-based forms to ensure proper compliance and safety standards.
How to Create a Form
- Log into your Sospes account. On the Sospes home page, select the Admin tab from the menu. (If the Admin tab is not available to you, you do not have permission to access the Admin page to Create/Edit forms.)
.png?width=595&height=396&name=Forms1-1%20(2).png)
- In the Admin menu, on the left-hand side, select Create/Edit Forms. (If Create/Edit Forms is not available for you, you do not have permission to Create/Edit Forms. You must be assigned the Form Admin role to create/edit forms.)
- On the forms page, you will see three available tabs:
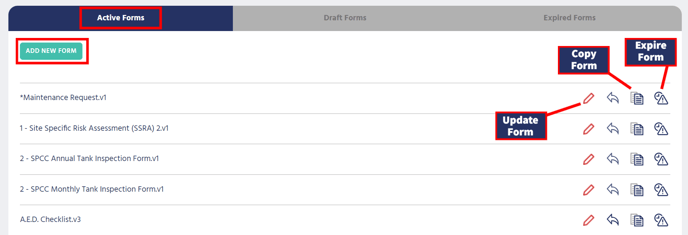
- Active Forms: Live forms that are currently available for your team to fill out and submit. You will find the Add New Form button available on the upper-left-hand side of this page.
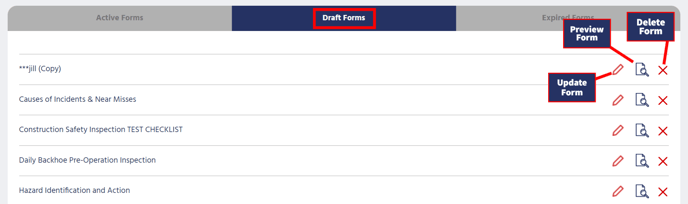
- Draft Forms: Forms that have been created, and saved, but not yet published. Draft forms are not available for your team to submit. Forms can be published, previewed, or deleted from this tab. (If you are not assigned the Form Deletion role, you will not be able to delete forms.)
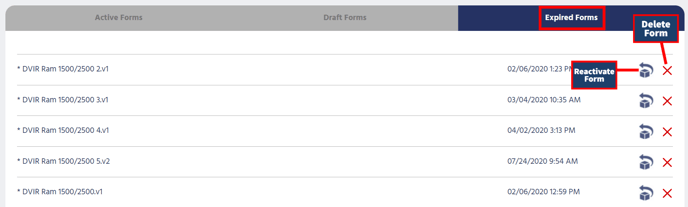
- Expired Forms: Forms that have been deactivated and are no longer available to your team. Forms can be re-activated or deleted from this tab.
- Active Forms: Live forms that are currently available for your team to fill out and submit. You will find the Add New Form button available on the upper-left-hand side of this page.
- It's time to create a New Form! On the Active Forms Tab, select Add New Form.
- Upon selecting Add New Form, you will be taken to a new Create Form page.
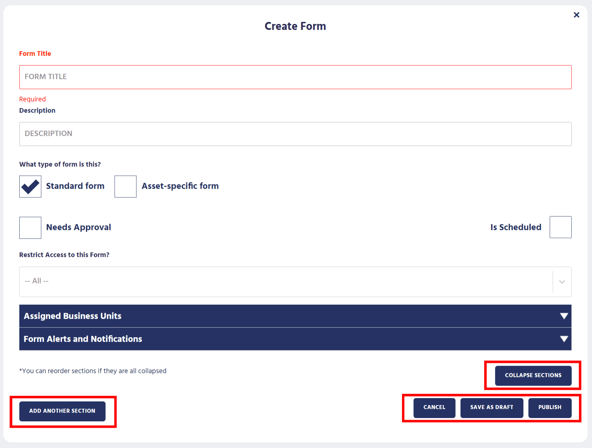
- Basic Form Overview:
- Form Title: Required for the creation of a New Form. This is how your form will be identified and displayed in Sospes.
- Cancel: Select to cancel form creation. If you'd like to save your form, make sure to select Yes to save your changes before exiting. If No is selected, your form will not be saved.
- Save as a Draft: Select to save your form without publishing it. To go back to your draft form, you will find it in the Draft Forms tab.
- Publish: Select to publish your form and make it available to your team and/or any business units assigned to the form.
- Add Another Section: Select to add an additional section to your form. Additional sections are needed to add questions, selections, etc. to your form. This will be the main command used to build out your form.
- Collapse Sections: Select to collapse all sections in your form. Alternatively, in order to rearrange form sections, you will need to collapse ALL sections, and drag/drop your sections by the title of the section.
- What type of form is this?: In this section, you will select what type of form you want to build. You can select a Standard Form, an Asset-Specific Form, or create a form that Needs Approval. (Forms that need approval can only be approved by those assigned with the Form Approver role.) Lastly, you can also schedule forms to be completed in specific facilities/locations on a daily, weekly, monthly, etc. schedule.
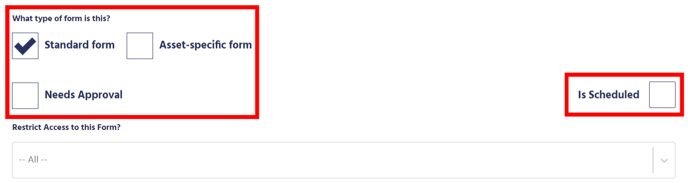
- Restrict Access to this Form?: Assign specific roles (ie. Admin, Form Approver, Supervisor, Safety Professional) access to view the form once the form is submitted. Only those assigned in this section will be able to view submitted forms.
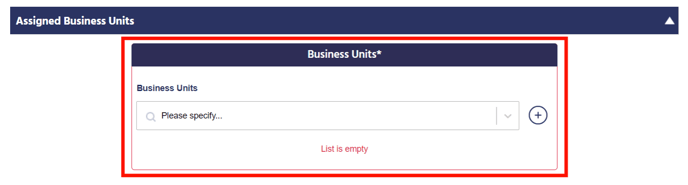
- Assigned Business Units: Select the business units you would like to have access to this form and select the + symbol. Once published, the form will only be accessible to those assigned to the chosen business units. You can assign a form to multiple business units. If you want the form available to all users in Sospes, select ALL.
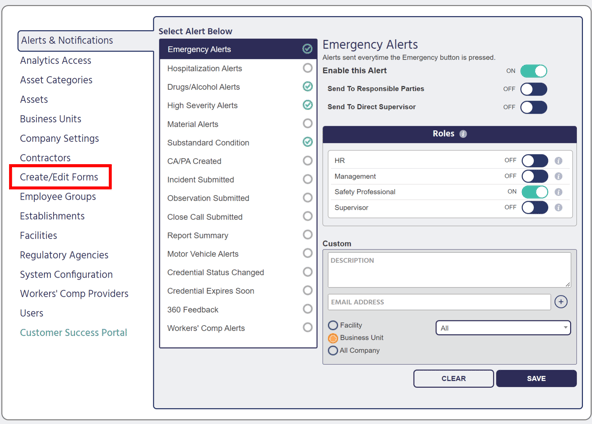
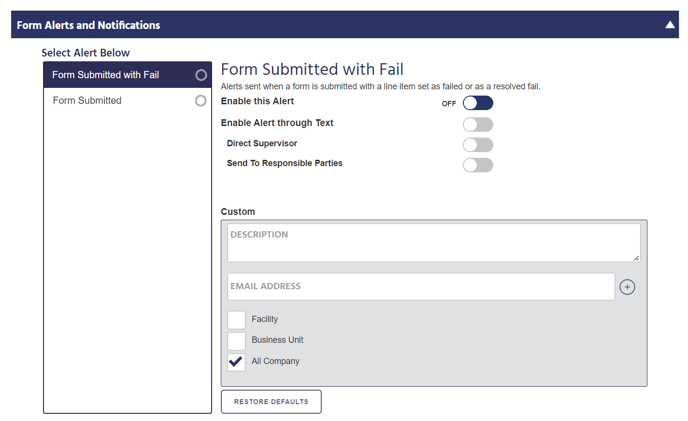
- Form Alerts & Notifications: In this section, you can configure notifications to alert various users when a form is submitted. There are two types of alerts:
- Form Submitted with Fail: Enable this alert for a specific party to be notified every time a form is submitted with a line item marked with a fail or as a resolved fail. This will only be triggered if there is a Pass/Fail/NA question on the form.
- Form Submitted: Enable this alert for a specific party to be notified whenever a form is submitted.
To learn the next steps in building out a form suited to your institution's exact needs, visit Building a Form in Sospes.
- Upon selecting Add New Form, you will be taken to a new Create Form page.
Let’s Get Better Together!
-2.png?width=255&height=117&name=Sospes%20Logo%20(1)-2.png)